
While one game for the weekend fell through, I was able to snag a match with a "new player": Kyle and his Dwarves. Having not met Kyle before we got to chatting and he's a veteran of The 9th Age, just new to TOW, so I felt good about giving him the 2000 Point match. Ordinarily I don't think that would be a good size for a learning game because there's too much going on, rules wise.
Not wanting to proxy stuff, I switched my list to more of a Chariot focused one. I'm still trying to pin down a Beastmen roster that I really like and feel "good" about, I think the Razorgors would fulfill that but time will tell. I'm also itching to get my Vampire Counts on the table....
Beastmen
Beastlord w/ Shield, Heavy Armor, Talisman of Protection, Slug-skin, Bedazzling Helm
Great Bray-Shaman (Demonology) w/ Lore Familiar
Wargor w/ Charmed Shield, Tuskgor Chariot
Wargor w/ Heavy Armor, Charmed Shield, Gnarled Hide, BSB
32 Gors w/ AHW, Standard, Champion
32 Gors w/ AHW, Standard, Champion
Tuskgor Chariot
Tuskgor Chariot
10 Ungors w/ Shortbows
10 Ungors w/ Shortbows
10 Ungors w/ Shortbows
5 Harpies
5 Harpies
3 Dragon Ogres w/ Heavy Armor, Great Weapons
3 Dragon Ogres w/ Heavy Armor, Great Weapons
Dwarven Mountain Holds
King (General) w/ Shield, 2x Rune of Shielding, Rune of Cleaving, Rune of Might, Rune of Fury, Rune of Preservation
Thane w/ Shield, BSB, Rune of Battle, Rune of Fear
Runesmith w/ Shield, Rune of Spellbreaking, Rune of Passage
Runesmith w/ Shield, 2x Rune of Spellbreaking, Rune of Passage
14 Dwarf Warriors w/ Shields, Great Weapons, Musician, Champion
14 Dwarf Warriors w/ Shields, Great Weapons, Musician, Champion
19 Longbeards w/ Shields, Great Weapons, Full Command, Rune of Confusion
10 Thunderers
10 Thunderers
Bolt Thrower w/ Rune of Skewering
Cannon w/ Rune of Forging
14 Hammerers w/ Shields, Full Command, Rune of Confusion
Organ Gun
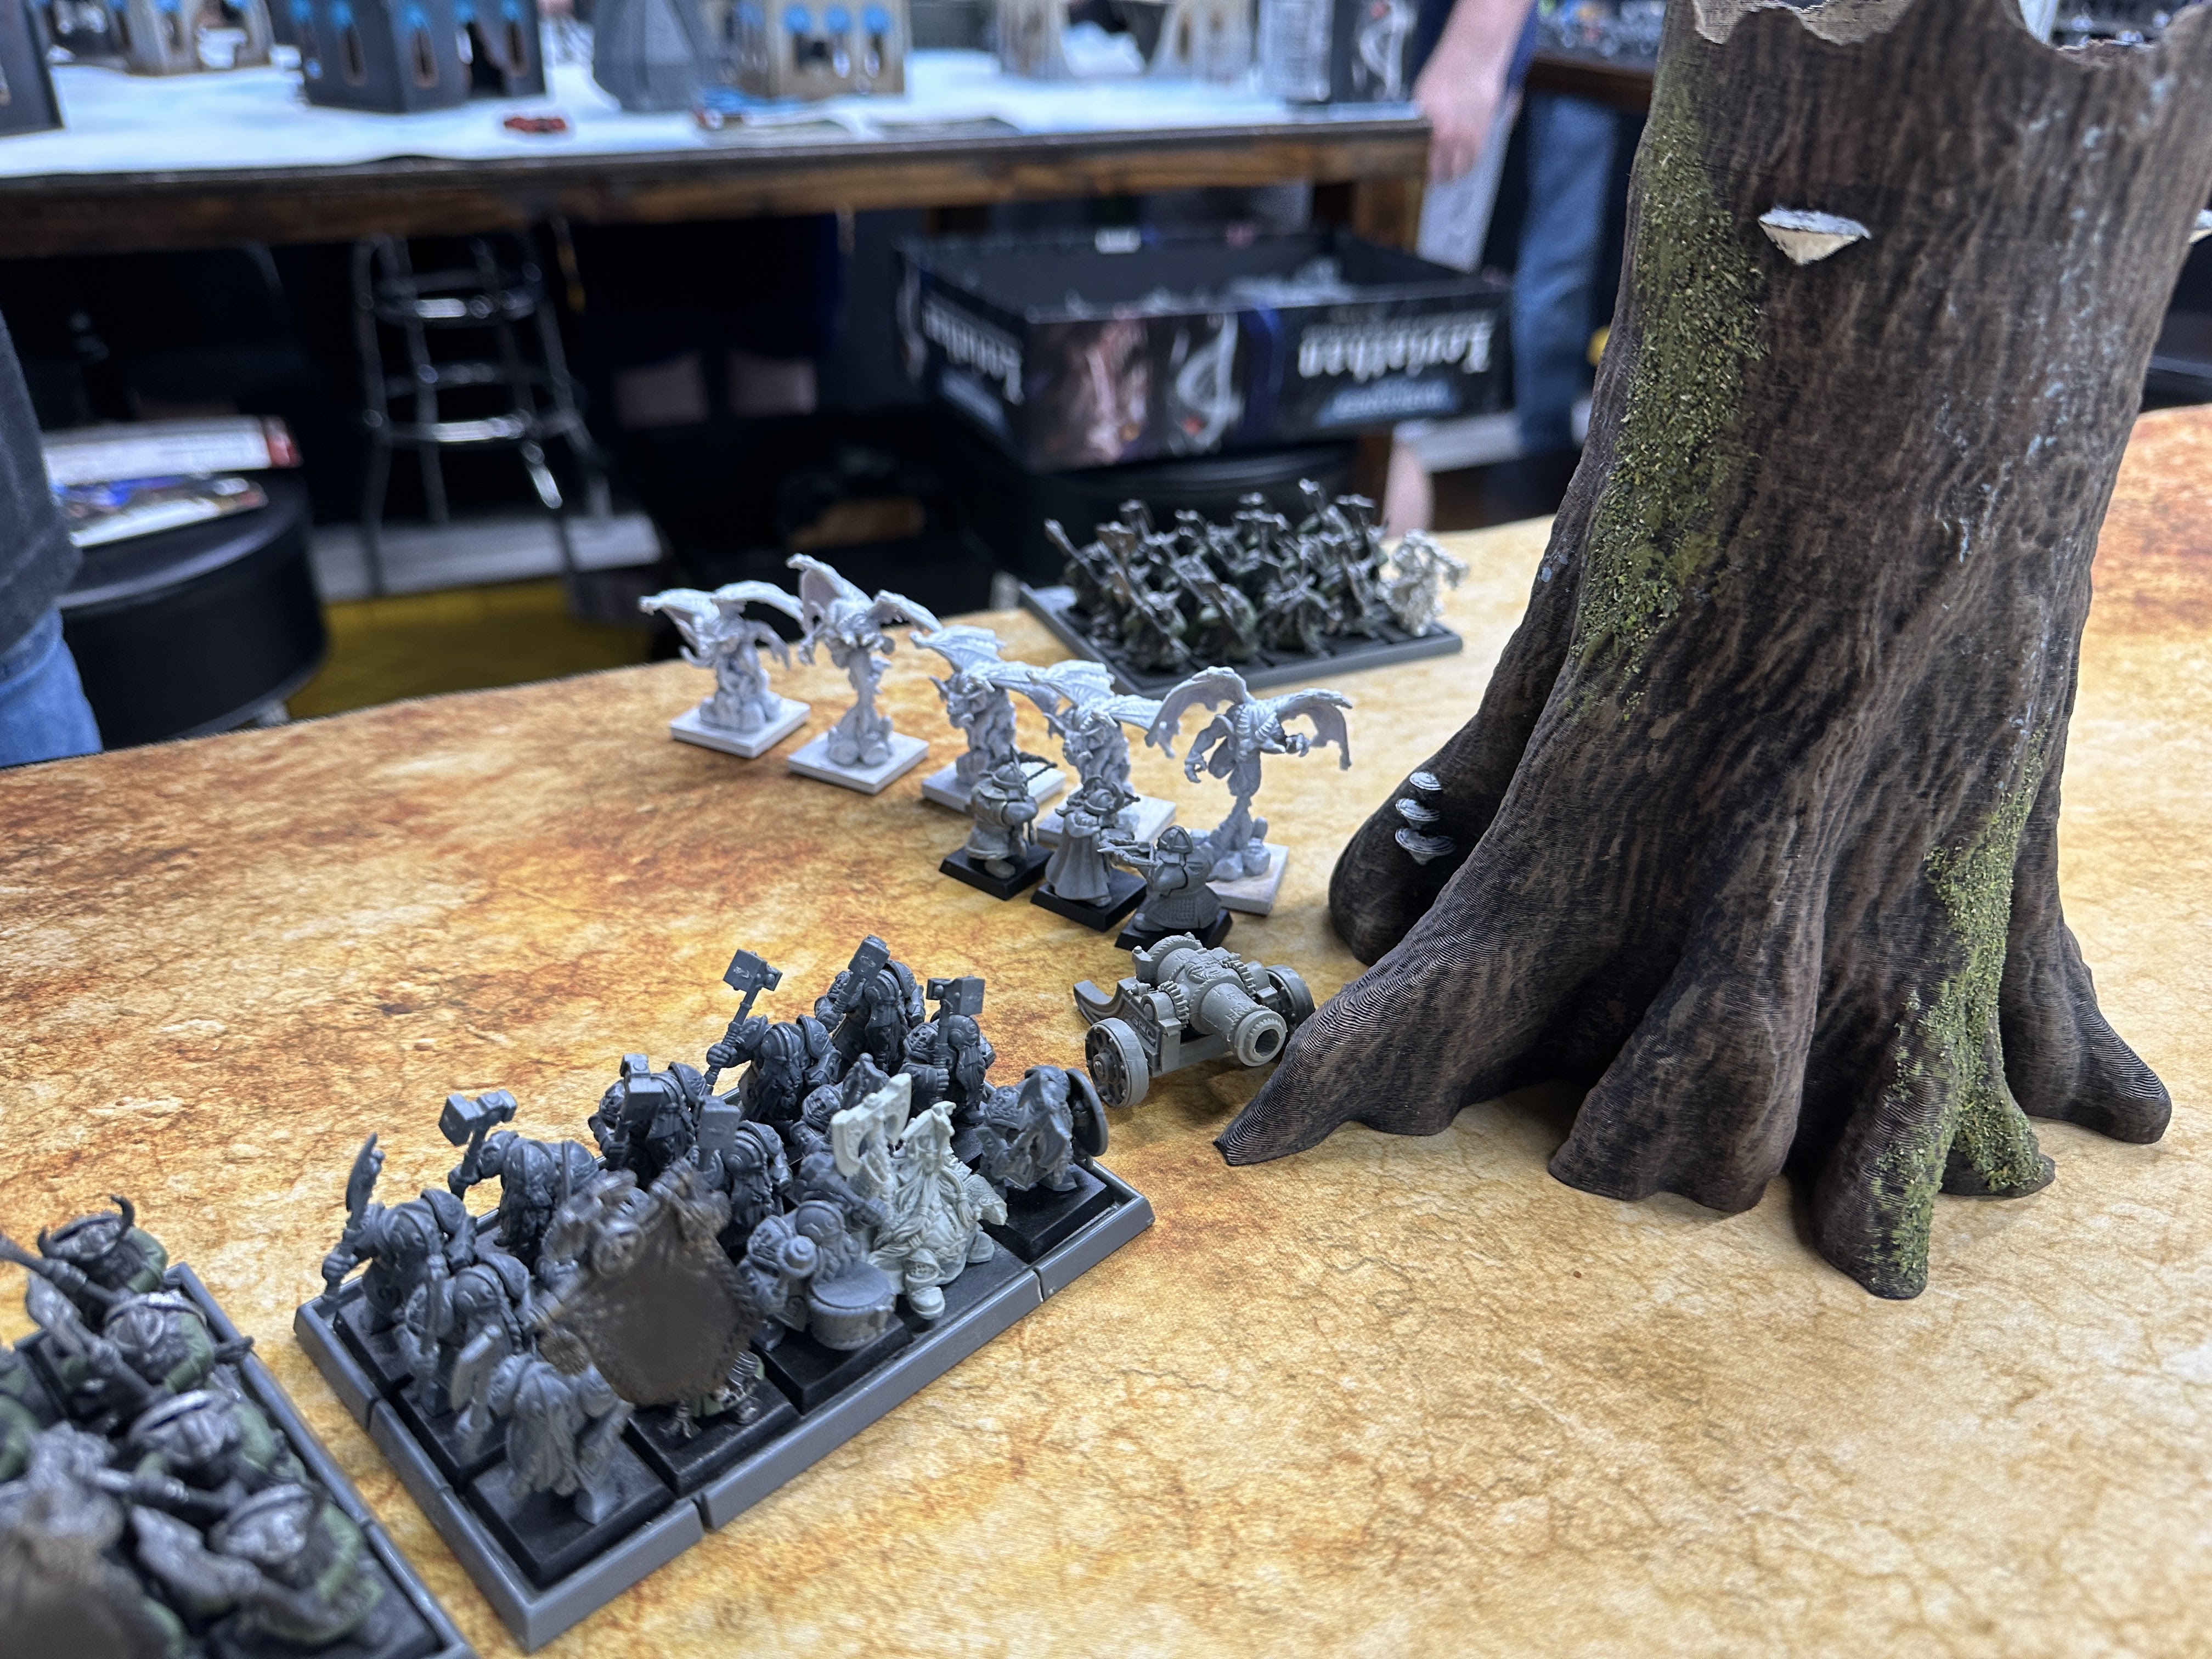
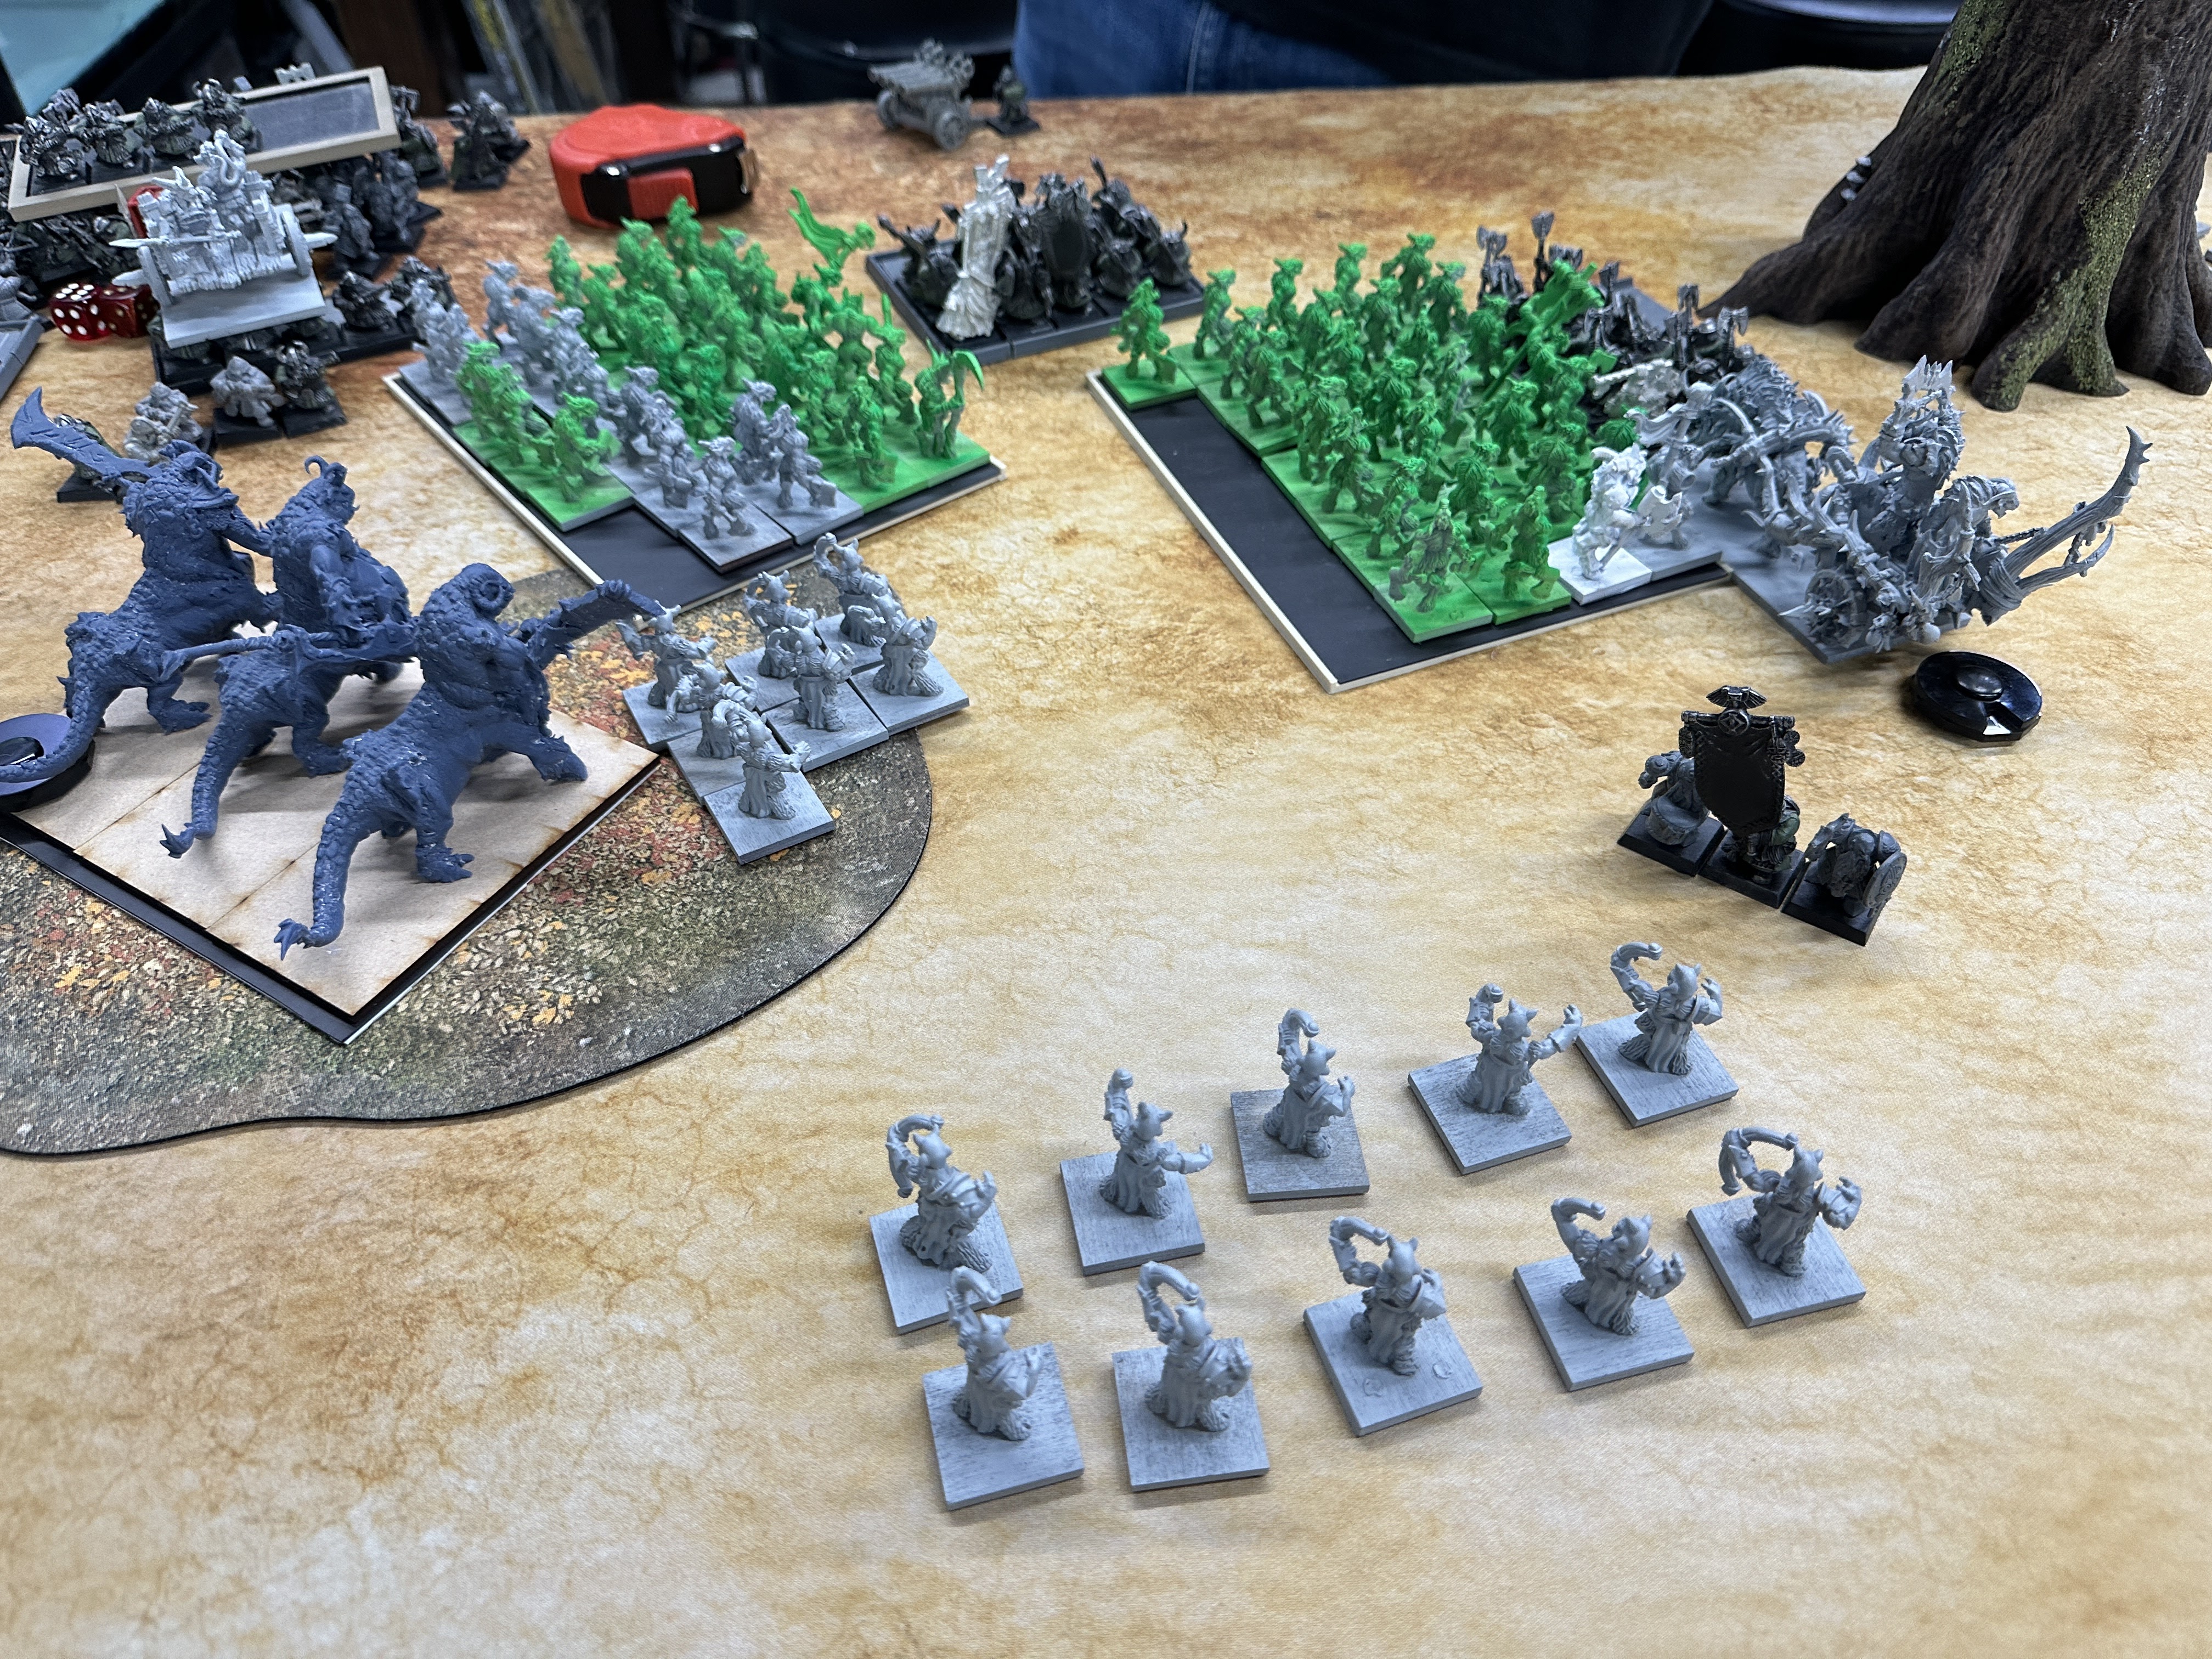
Setup & Deployment
After rolling Flank Attack, we built the table with me placing the first piece. I dropped the Forest in the Upper-Left (my perspective), the Ork Tower (Impassable) on the Left, and the Forest on the Right. Kyle placed a Building, an Impassable Treestump, and the Forest in the Upper-Right. Some of the Terrain had zero impact on the game, so I may not have amazing photos of it all.
I believe we played the Meeting Engagement special rules incorrectly, reading it now you simply roll for each Unit/Character and on a 1, they go into Reserves. We played it as you rolled for the Unit as it was deployed, including Characters that may be in it, and on a 1 the whole thing goes into Reserves. I'll make a note of this for future games, but since we both did the same thing I'm not going to fret over it.
For Reserves I got a Gor Unit with Bray Shaman, a Unit of Harpies, a Unit of Ungors, and a Unit of Dragon Ogres. Kyle got the Organ Gun, and a Unit of Dwarf Warriors with Runesmith. My Spells were Demonic Vessel, Demonic Vigor, Steed of Shadows, and Gathering Darkness.


In Deployment the Marching Order was:
- Thunderers
- Ungors
- Thunderers
- Ungors
- Warriors (on the left)
- Gor Herd
- War Machines
- Chariot
- Longbeards
- Chariot
- Hammerers
- Dragon Ogres
- Characters (Dwarf)
- Characters (Beastmen)
- Harpies (as Scouts)
My pregame read was that the Scenario favored me, since I will eat less shooting thanks to the 12" separation, compared to normal 24". I did roll a lot of 1's so a bunch of my army isn't on the table but maybe my +Movement Spell and Steed of Shadows can help with that. Kyle is also in a pretty wide line so my hope was to keep the stronger, right flank at bay and crush the left with my faster elements and then see what's what.
Rolling for first turn, Kyle won and took it in true shooting army fashion.
Dwarves & Beastmen Turn 1
Very little happened here so I'm going to combine the two turns. Kyle ever so slightly shuffled a unit or two, just making sure to keep his flank arcs in check. The Bolt Thrower tried to shoot my left-most Chariot but missed (Long Range, Partial Cover) and the Thunderers had similar luck (Long Range, Partial Cover). The Cannot turned and put the strike point right between my two Chariots, then bounced through one but only did a single wound.
On my turn I pulled the Harpies out from behind the tree, giving them LoS to the Cannon for next turn. Everything else Marched full speed except the Chariots/Dragon Ogres, I was content to use my Skirmisher shield for another turn.


Dwarves & Beastmen Turn 2
Again, these were fast turns so I'm bundling them. I promise things pick up on Turn 3. Once again the proper Dwarf blocks rotated a bit to keep the arcs clean as I advanced. The Organ Gun walked on in the backfield, away from my existing Harpies, with a sliver of LoS between the Thunderers and Longbeards. The Warriors came on directly behind the Cannon, assumedly to reinforce the crew or make me reconsider the charge.
Shooting was ineffective yet again as the Thunderers took aim at the Ungors this time, killing 1 in total. The Bolt Thrower flew wide yet again for the same penalties and the Cannon aimed for my Wargor Chariot but only did a single wound, at the cost of its Rune of Forging. Thus far my screens were working out very well, making up for my bad Reserves.
My Reserves all came on the far-left as we both mistakenly played that
the units can March on, this favored me but didn't play out massively on
the game. It's frustrating to make mistakes but they are getting less and less each game, there's just so many rules!
On my turn everything Marched again except the Harpies who charged the Cannon, leaving the Dwarves outside of charge range except for one Chariot I intentionally left within 9" of the Dwarf Warriors on the far-left. My hope was if Kyle took this charge I could just Flee and get my Reserves to fight sooner, but I didn't expect him to take the bait even if I was say, a 4 away on the charge roll.
In Combat, neither the Harpies nor the Cannon crew did any damage so we just stared at each other. I'd definitely lose the Harpies now but it stopped the Cannon from shooting once, that's all I needed.


Dwarves Turn 3
Going directly to Movement, the Dwarf Warriors fresh from Reserves charged my Harpies in the rear. One of the Thunderer units made a Turn and moved a bit, trying to clear more LoS for the Organ Gun. On my left, the Dwarf Warriors there moved a bit to keep my new arrivals in their front arc but otherwise largely held position.
Shooting went better as the Bolt Thrower put one of my Chariots on its last wound but the Organ Gun goes a Misfire and wasn't able to hit anything. The stationary Thunderers whiffed again as well: I said better, not ideal.
Combat was brief as I lost 3 Harpies, killed nothing, and then the rest of the Harpies were killed by the Cannon crew. Unfortunate but I'd be in combat next turn so the Cannon's time was done and we'd already played half the game.

Beastmen Turn 3
I attempted to cast Demonic Vigor on the Dragon Ogres, since they had a long charge, but it was met with a Rune of Spellbreaking. Nothing else was worth casting so I went to Movement.
Charges went off all over: the badly wounded Chariot and Dragon Ogres into the Dwarf Warriors on the left, the Harpies into the Bolt Thrower, the unharmed Chariot and Ungors into the Thunderers (through Terrain), the Gors into the Longbeards, and the Dragon Ogres into the Hammerers. All charges were made and met with Hold Reactions, except the Thunderers who put 2 wounds on the Chariot.


Remaining Movement pushed my Wargor Chariot up in case it could find a way in, the other Ungors went around the Tree Stump, and the rest Marched forward after I failed to cast Steed of Shadows. In Shooting I killed a single Warrior with my cheeky Ungors.

Starting from the left, my Harpies ate two of the crew from the Bolt Thrower and lost none, but it only Gave Ground. The Dragon Ogres mangled the Dwarf Warriors as Kyle couldn't make any Armor Saves, losing 10 (using Hand Weapons and Shields) but doing a wound back and also only Giving Ground thanks to Shieldwall. My Ungors and Chariot killed 5 Thunderers and lost an Ungor in return, but they too still Gave Ground.


In the big fight my Beastlord declared a Challenge, which was accepted by the Longbeard Champion. In some shocking dice of my own I didn't even inflict a wound and only killed 4 overall, losing a Gor in return. As expected, the unit Gave Ground. Lastly, my Dragon Ogres endured a slew of dice but only took 3 wounds somehow, killing 4 Hammerers. This led to the Dragon Ogres Giving Ground.


Looking over the table, my overall plan was working. The Hammerers sucked to charge into but it had to be done, my hope was the Toughness 4 and 3+ Save would keep me around and it did. I was hoping to punch through the Thunderers, or at least force them to FBIGO, but it wasn't to be and overall I had my good breaks than bad.
Dwarves Turn 4
Pushed back but not out of the game, the Dwarves went about shoring up their ranks. There were no charges, so the Warriors busied themselves reading to hold the line if I broke through either the Longbeards or Hammerers.
Exalting at its victory, the Cannon went to fire and promptly blew itself up. Somewhere, the corpses of my Harpies were laughing.

Our myriad of combats continued on. The Harpies slew the last of the Bolt Thrower crew and Overran, but only 3" as I declined to use Swiftstride. Kyle's Runesmith finished off my Chariot but the Dwarf Warriors were killed to a man, Runesmith included, and my Dragon Ogres successfully restrained. Finishing the left, my Chariot and Ungors did nothing and took no damage, but both only Gave Ground thanks to the General being nearby.
On the right my Beastlord, again, failed to inflict a single wound and overall I heavily whiffed. The Longbeards brought down a few models and I barely lost the combat but FBIGO. With my turn up next Kyle wisely Pursued and was successful. Finally, my Dragon Ogres rolled well and left the Hammerers on 6 models, including the King, but took 4 wounds back and Gave Ground.


Beastmen Turn 4
Most of the combats were not going as I expected but I'm not really losing anywhere so things could be worse. I was able to cast Demonic Vigor on the Dragon Ogres, helping their charge into the Forest, but quickly went to Movement.
My Dragon Ogres declared into the small Thunderer unit and the Harpies into the Organ Gun, both successfully. Once again I failed to cast Steed of Shadows and so just marched the Gors and Ungors on my right, while the Ungors on my left continued moving around to harass the Dwarf Warriors and maybe contribute a cheeky Rear Charge later. In Shooting I killed another Warrior, making them lose a Rank Bonus at least.
Combats yet again went weirdly. I crushed the Thunderers as expected, Overrunning with the Chariot into the other Thunderers (and passing Dangerous Terrain) but restraining with the Dragon Ogres and Ungors. In the big fight, my Beastlord finally killed the Champion and got a point of Overkill and then we both whiffed at each other, causing the Dwarves to lose by 1. They then Fled, even after a re-roll, but outpaced my Gors by 2". My Harpies reduced the Organ Gun to a single crew, losing a wound back, and it FBIGO but stayed on the table.
Finally, the King declared a Challenge which my Wargor was forced to accept. He was then immediately killed by 3 wounds from Impact Hits, failing all three Armor and Ward Saves! Outraged, the Hammerers then butchered my Dragon Ogres, winning the combat, and forcing my Chariot to FBIGO. The Hammerers Pursued but came up short, although this did open a flank charge for the remaining Dwarf Warriors.


Dwarves Turn 5
With the lines hopelessly shattered, Kyle quickly rallied the Longbeards and charged the flank of my Gor Herd with his Warriors. What remains of the Hammerers shifted to avoid a flank charge from any number of threats, my hope was to finish them off with the Ungors over the last turn or two if need be.


With no shooting, we went right to combat. This time, my BSB declared a Challenge after the Beastlord moved to the fighting rank, this was accepted by the Champion. This time the Champion died, but my Beastlord AGAIN failed to inflict a wound, and the Gors/Warriors/Runesmith contributed nothing either. In the end I won, but the Warriors only Gave Ground, so I restrained successfully and turned to face them.

In the little fights my Chariot got 7 Impact Hits and smashed through 6 Thunderers for no damage back, forcing them to FBIGO which I again Pursued successfully, getting out of the Forest. The last Organ Gun crew killed another Harpy and I did nothing, they Fled as we both assumed the Organ Gun would now blow itself up to join the Cannon.

Beastmen Turn 5
It's all over but the shouting now so I busied myself making sure I could get whatever Victory Points were left. Demonic Vigor was again cast on the Dragon Ogres to help them get around.
My sole charge was the Wargor Chariot into the Dwarf Warrior flank. I finally cast Steed of Shadows, marching the Gors over the Forest and to the flank arc of the Longbeards, daring them to flank my other Gor Herd. Ungors moved around to get LoS on the Hammerers and the Dragon Ogres moved to charge should they need to on Turn 6. With my few shots I somehow killed two Hammerers, forcing a Panic Test, which they failed and fled from. This put them under 25%, so rallying was unlikely and I could easily Charge them to run them down.
Our remaining combat went as expected, with the Chariot crunching a bunch of Dwarves while the Beastlord finally rolled more than a 1-2 on a d6 and contributed. The Warriors fled but outpaced me because they had a smaller Wheel around the Tree Stump compared to my larger unit. At this point Kyle conceded the game, having two units fleeing (one under 25%), a single Organ Gun crew, and a unit of Longbeards that were going to eat a Chariot and the other Gor Herd, at best.


Post-Game
First, as I touched on there were some rules issues, Reserves being the main impactful one. This let me charge the Bolt Thrower and other units on the left a turn sooner, in all likelihood, but it fortunately didn't have much of an impact on the game. Even if those units didn't come in on Turn 3, the Dwarf Warriors couldn't peel away to help the Thunderers and there was nothing for the Bolt Thrower to shoot that would have changed the game. While it's really bad that I made this mistake, I take some consolation from the fact that nothing would have played out differently with the more impactful, right flank.
Going past that, I was overall happy with how my army played and its performance, this is certainly the more "friendly" build for my Beastmen. I was glad that it gave Kyle a variety of units to see and showed some solid synergy without being so strong that it would just run a newer player over. In the past I've struggled to make armies that are a bit toned down, so I'll take that as a win.
In after-game discussion both Kyle and I agreed that Ballistic Skill shooting for Dwarves is not what it once was, although I put Bolt Throwers as an exception to that. TOW is extremely permissive with Partial Cover, and even Full Cover, so it's hard to get shots on the units that matter. While War Machines are also nerfed compared to older Editions, I find that they do more than static Bowmen/Handgunners, those units only shine when they're mounted or at least Skirmishers.
I never mentioned Gaze of the Gods because I didn't roll it early (I'm more scared of Stupidity on my units than hoping for a 4+, unless I feel the fight is bad) and later on I got nothing relevant. Once you get into the mid-game I see no reason not to roll Gaze of the Gods every time, but an early Stupidity and a failed test could easily lose a game. If only I was allowed re-rolls like the cooler Chaos boys.
On my part it was nice to feel like I played a game where all my units were used in the role I wanted them for. The Harpies got to go after War Machines for once, I screened much better with the smaller Ungor units than I have, and I was able to tie up a wide swath of the table to prevent counter-charges. The Reserves certainly screwed me over a bit, and I don't love that rule since it can have a really big impact on the game, but it's fine. If you lose a lot to Reserves you just have to deploy conservatively and wait until Turn 2-3 to be whole, I just didn't have that option against Dwarves.
Lastly, I've been worried for Dwarves since I read their rules and this game reinforced that. I know it was someone's first game and Kyle didn't play poorly at all, Dwarves just have some difficult to overcome weaknesses. Being charged is worse than ever because it can keep happening via FBIGO, which means Dwarves keep fighting last and getting few attacks with their expensive infantry. They have the worst anti-Magic in the game besides Khorne Demons and it forces the player to pay a ton of points as tax to even be "okay" at Dispelling, especially non-Hexes/Magic Missiles. War Machines and shooting also feel nerfed overall, which I love since shooting is boring, but it hurts the stunties.
I'm not saying Dwarves can't work, don't add me to the Book of Grudges. They have some premier units (Hammerers and Ironbreakers) outside of Gyrocopter Spam, it may just be that the army has to play differently than it has in the past. I'd be looking at a lot of Infantry, very War Machines, and a lot of Characters. Thanes are very cheap for their profile and Longbeards are a no-brainer over Warriors, +4pts for +1 WS, Str, Gromril Weapons, anti-Panic, and Veterans? Crazy good, take that and Rangers as the bulk of the Core. Traditionally Dwarves have played 3 blocks of Infantry and a lot of shooting but I'd be aiming for 4-5 blocks, less shooting, and something help with Magic. But I don't play Dwarves, so what do I know? Very little.
No comments:
Post a Comment